Health Tips, Yoga, Spiritual & Computer Hardware Drivers (1000 and above Free Software Download Center And Related Topics and Hot news)


Search This Blog

Monday, May 17, 2010

Windows Tips

Windows Command Prompt

The Microsoft Windows command prompt is an invaluable tool that can be used in conjunction with Windows. Below are some helpful shortcuts and tips that can be used to improve your abilities while in the command prompt. Users not familiar with how to enter the command prompt can find additional information about this in document CHDOS.

  1. Press the up arrow key to scroll through all previously typed commands at the prompt. This is helpful for when you need to type long commands in more than once. Note. If
  2. Pres the tab key to auto-complete the names of directories or files. For example, at C:\ type: "cd wi", press tab and the command prompt should complete WINDOWS as the name of the directory.
  3. Familiarize yourself with the top MS-DOS commands and each of their available switches.

Create Desktop Shortcuts to Your Favorite Web Pages

Easily create Windows desktop shortcuts to your favorite web pages by following the below steps.

  1. Open the web page you wish to create a shortcut for.
  2. Resize your browser window so it's not maximized.
  3. Once in a window mode click the icon to the left of the Internet address in the address bar and drag it to your desktop and let go to create a shortcut.

Create Custom Folder Icons

Create a folder that looks customized in Microsoft windows, by saving one of the images or a copy of an image in the folder as folder.jpg. Once this has been done if you're viewing the folders in Thumbnail view, that folder will display the folder.jpg image on top of the traditional folder.

Windows Snap To feature

Enable the Microsoft Window XP mouse Snap To feature to automatically focus on dialog box buttons. Enabling this feature will automatically move your mouse cursor to the default button on any dialog box that appears on Windows. This is a great way to save a little time and not have to move you mouse cursor to the "Ok" button each time a dialog box appears. To enable this feature follow the below steps.

  1. Click Start, Settings, Control Panel.
  2. Double-click the Mouse icon
  3. In the Mouse Properties window click the Pointer Options tab and check the "Automatically move pointer to the default button in a dialog box" option.

Windows Selective Startup

Improve overall system performance, boot time, and get rid of programs you don't want running in the background, by choosing to do a Selective Startup in msconfig.

  1. Click Start, Run and type: msconfig and press enter.
  2. In the System Configuration Utility click the Startup tab.
  3. Uncheck programs you do not wish to load each time your computer starts. Once done click ok and restart the computer. After the computer boots back into Windows you will receive a prompt about Windows being in a selective startup. Check the box to not receive the prompt and click ok.

Saving Windows XP and Later Searches

Save your frequent Windows XP and later version searches for future use by following the below steps.

  1. Open the search and enter the search queries you wish to save. For example, you could save a search to find any remix mp3 files by entering: *remix*.mp3 in the all or part of name box.
  2. Once the values have been entered test the search and allow you to save the search.
  3. In the Search Results window click File and then Save Search.
  4. Finally, browse to the location you wish for this file to be saved and name the file with a .fnd extension.

After completing these steps you'll be able to quickly perform a search by simply double-clicking the file.

Determine last modified date of a web page

For web pages that do not list their last modified date, you can quickly determine the exact date and time when a website was last updated or modified by inserting the below string into the address bar.

javascript:alert(document.lastModified)


Move forward and back using the keyboard

In all major Internet browsers you can move move forwards and backwards by pressing and holding the ALT key and then pressing the left or right arrow key. Pressing the left arrow will go back a page and pressing the right will move forward a page.

Increase / decrease web page font size

Quickly increase and decrease the size of the text or fonts on a web page by holding down the CTRL key on the keyboard and scrolling up or down with the wheel on a wheel mouse.

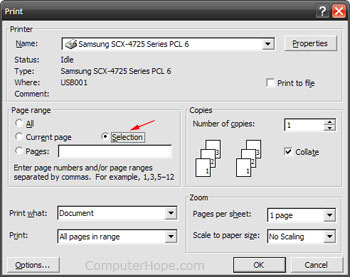
Print only sections of a page

Save on your printer ink by selectively printing in Windows programs such as Microsoft Word, Excel, Internet Explorer (and other browser), WordPad, Outlook, etc. To do this highlight portions of text you wish to print and click the Print icon or option in the File menu. In the printer dialog window (like the one shown below) under Page Range choose the option Selection.

Print highlighted selection

Open link in new window

Open a link in a new browser window by holding down the shift key on the keyboard and clicking on the link. This works on all major browsers including Microsoft Internet Explorer and Mozilla Firefox.

Alternatively a user could right-click on the link and choose Open in New Window.

Automatically complete a URL

Automatically enter the www. and .com into most major browsers URL or address bars by typing the name of the page and pressing CTRL + ENTER on the keyboard. For example, if you type: computerhope and then press CTRL + ENTER you will automatically be sent to www.computerh9s.blogspot.com

Move forward and backward using the mouse wheel

Quickly move forwards and backwards between web pages by holding down the shift key and scrolling up or down on your mouse wheel.

Quickly scroll to an item in a list or drop down

Quickly find text, an icon, or other item in a group or list by highlighting one of the icons or clicking on the list items and pressing the beginning letter of the item you're looking for. Below are some examples of how this could be used.

Internet drop down list

Instead of scrolling through a list of options in an Internet drop down list press the first letter of the option you're looking for. For example, if you wanted to get down on the below list of countries to United States you could click the down arrow and then press U to quickly move down to the first item beginning with U, which in this case is Uganda. If you continued to type United... it would continue to scroll down as long as a result was found.

Windows desktop icons

If you have a lot of icons on your desktop or in another folder highlight one of the icons and press the first letter. For example if you were looking for an icon named "test" highlight any icon and then press the "t" key. Note: you can also press the "t" key multiple times to individually highlight each icon that starts with "t".

Quickly open multiple favorite pages

Open all your favorite daily visited web pages in two clicks. First, create a folder in your bookmarks that contains the web pages you visit daily. Once created you can right-click that folder and click "Open in Tabs" to get all your favorites in the folder opened in a new tab in the current window.

Make the browser window full screen

Make your Internet Explorer or Mozilla Firefox the full screen without all the toolbars by pressing the F11 key. To restore the window back to how it was press F11 again.

Quickly scroll up and down on a web page

Quickly scroll one page at a time in all major browsers including Microsoft Internet Explorer and Mozilla Firefox by pressing the spacebar. Move back up the page by pressing Shift + spacebar.

Save any media on a web page

Quickly save any media including embedded content to an alternate source by right-clicking on a page click "View Page Info", click the Media tab, locate the media file you wish to save and click the Save As button.

Note: This does not work all media because of how it may be handled by the website. For example, this will not work with YouTube videos.

Quickly get to the address bar

Quickly get to the address bar in Internet Explorer and Mozilla Firefox by pressing the F6 key on the top of your keyboard. Opera users can press the F8 key to get to the address bar.

In addition to the above function keys users can also use CTRL + L and/or CTRL+O to quickly get to the browser address bar in almost all browsers.

Quickly bookmark a web page

Quickly bookmark any web page in all major browsers by pressing CTRL + D on your keyboard. Pressing these two keys together will open the bookmarks or favorites for your browser and allow you to quickly place a bookmark for the page you're currently at. For example, pressing the two keys now would bookmark this page.

Undo closed Internet browser tab

Oops did you mistakenly close a tab you didn't want to close? Press CTRL + Shift + T to undo a close tab. Pressing this more than once will undo multiple closed tabs. This feature works in all major browsers including Mozilla Firefox, Microsoft Internet Explorer, and Opera.

40 End


Speed up Windows Explorer

Speed up Windows Explorer

Speed up the display load time of Microsoft Windows Explorer by disabling the feature that allows you to search for network printers and folders. By default each time Windows Explorer is opened it will attempt to locate any network printer or folder on your computer network. If your computer is not on a network and/or you have no network printers, folders, or shares disable this option by following the below steps.

  1. Open Windows Explorer
  2. Click the Tools drop down menu and then Folder Options
  3. Within the Folder Options tab click the View tab
  4. Uncheck "Automatically search for network folders and printers"

Microsoft Windows XP and Vista boot time

Microsoft Windows XP and Vista boot time

If you're running Windows XP or Vista with a computer that has a multiple core processor, such as the Intel Core 2 duo, you can increase how fast your computer boots up by having it use multiple processors for its boot sequence. Following the below steps to have Windows do this for you.

  1. Click Start and Run (for XP) and type: msconfig and press enter.
  2. Click the BOOT.INI or BOOT tab.
  3. XP users highlight the line beginning with "multi" if not already selected and click the Advanced Options button.
  4. In the Advanced Options Window for /NUMPROC= or Number of Processors change it to 2.
  5. Reboot the computer.

Computer mouse tips

Computer mouse tips

Using the mouse in combination with the keys on your keyboard can give you several different advantages and help improve your overall productivity on the computer. Below are just a few examples.

Almost all text editors

Many text editors or programs that allow you to edit text support the ability to quickly highlight all or portions of text by using the Shift key and the mouse. For example, move the cursor to the beginning of the text you wish to highlight, hold down the shift key, and click at the end of the text you wish to highlight. If supported and done properly this will highlight all text in-between the points you clicked.

Microsoft Word

In Microsoft Word holding down the ALT key on your keyboard while clicking and dragging your mouse and you will be able to drag a box and highlight only portions of text and not the whole line.

Windows Explorer and many other file

Microsoft Windows Explorer and other file managing programs allow users to select multiple files by holding down the CTRL key and clicking each file or folder they wish to select or hold down the shift key and selecting multiple files at once.

Microsoft Internet Explorer, Mozilla Firefox, and other browsers

Users who visit a website with tables and wish to only select one row of that table can hold down the CTRL key and click and drag on the text in the row they wish to copy.

Mozilla Firefox users

Mozilla Firefox users can also hold down the CTRL key and individually click on each cell they wish to copy.

Sunday, May 16, 2010

Hide / tweak the Firefox download window

Hide / tweak the Firefox download window

Remove that pesky download window that appears after downloading a file by adding the Firefox Download Statusbar Add-on to your browser. Alternatively editing the about:config settings as shown below can also disable this window from being displayed.

  1. Open a new tab in Firefox.
  2. In the address bar type: about:config
  3. Locate browser.download.manager.showWhenStarting by copying and pasting the bold text into the Filter box.
  4. Double-click the name or value to change the value from True to False. Once done close the tab.

If you've hidden your download Window it can still viewed by clicking Tools and then Downloads or pressing Ctrl + J.

Move back faster in your browser

The most commonly used feature in Internet browsers is the back button. However, all browsers also have a small down arrow to the right of thes buttons (as shown in the below picture). This button allows you to easily see the history of the last 5-10 pages you've visited and quickly get back to them. This feature is especially helpful for those pesky pages that forward you back to a page each time you press the back button or for when you wish to move back several pages but don't want to have to press the back button several times.


Browsing only safe Internet web pages

Web of Trust or WOT warning screenConcerned about the safety of web pages you or others are visiting on your computer? Consider installing the free browser add-on WOT (Web of Trust), when installed this free add-on will display a large warning across the window of any web page that has been poorly rated, contains adware, been known to fraudulently charge visitors, contains malware, and/or is otherwise unsafe. This add-on can be downloaded from their web page.


Tabbed browsing tips

Tabbed browsing tips

With the introduction of Microsoft Internet Explorer 7 all major browsers now support tabbed browsing. Below are various tips to improve your browsing using tabs.

  1. Clicking on any link with your middle mouse button or wheel will open that link in a new tab. Alternatively you can hold down your CTRL key in IE and Firefox and click a link to open that link in a new tab.
  2. Clicking on an open tab with your middle mouse button will close that tab.
  3. Mozilla Firefox users can middle-click the back button to open a previous page in a new tab.
  4. Pressing CTRL + T will open a new tab in IE, Firefox, and Opera.
  5. Pressing CTRL + Shift + T will undo the closed tab. Alternatively right clicking on a portion of the tab bar will also display this option.
  6. Firefox and IE users can hold down CTRL and press 1 through 0 on their keyboard to open that respected tab.
  7. Right-clicking the active tab will give you an option to close all other non-active tabs.

Create a shortcut key for Internet web pages

Create a shortcut key for Internet web pages

Create a PC shortcut key to a favorite web page by following the below steps.

Internet Explorer users

Users using Internet Explorer can quickly do this by right-clicking on an empty spot of a web page and click 'Create Shortcut'.

Other Internet browser users

If your browser window is maximized make it a window. Once done click and drag the icon next to the URL and drag it to your desktop or other location you wish to create the shortcut.

Once the shortcut has been created locate the shortcut and right-click it and click Properties. In the shortcut properties assign a new shortcut key and click OK. Now when the shortcut key is pressed the web page will be automatically loaded.

How do I create a Windows shortcut key?

Question:

How do I create a Windows shortcut key?

Answer:

Create a shortcut

  1. Open the folder or directory that contains the program you wish to create a shortcut for.
  2. Right-click on the program and click Create Shortcut.
  3. This will create a shortcut named "Shortcut to " in the directory you are in. If you wish to rename this shortcut, right-click the file and click rename.
  4. Once the above steps have been completed, you can copy or cut this shortcut and paste it anywhere to execute this program.

Assign shortcut key to that Windows shortcut

Once the shortcut has been created to assign a shortcut key to that Windows shortcut follow the below steps.

  1. Right-click the shortcut and click Properties.
  2. Click the Shortcut tab.
  3. Click in the Shortcut key box and press a letter. For example, if you press "p" the shortcut key will automatically be made Ctrl + Alt + P. Which means if saved when pressing Ctrl and Alt and "P" all at the same time will run that shortcut.

Tuesday, May 11, 2010

NOD 32 virus removal tool

NOD 32 virus removal tool
Occasionally, uninstalling an antivirus program using Windows Removal program is not sufficient due to system integration. We may either end up fail to uninstall them completely or in worst case, we don't manage to uninstall a particular software at all. Because of the nature of software and system integration, most antivirus developers has come up with special tool to completely remove their products.

Removing Nod32 is not actually problematic as many people think. Having said that, after we just finish performing a normal uninstallation, you need to remove manually few files in its directory. That shouldn't be a problem but it requires some registry tweaking which in turn demands some advance knowledge.

Nod32 Removal tool v.1.0.0.2 is a small tool developed by Nod32 Netherlands (interface language - Dutch only) that can give you peace of mind. In order to completely remove your NOD32 software simply double click on the NOD32 Removal Tool, select ‘Yes’, and wait for a confirmation before it finishes its job. That's it!

http://blog.eches.net/security/nod32-removal-tool-remove-completely-nod32-antivirus/

Hardware

Hardware is best described as a device that is physically connected to your computer or something that can be physically touched. A CD-ROM, Monitor, Printer, and video Card are all examples of computer hardware. Without any hardware your computer would not exist and software would have nothing to run on. The image to the right is of a webcam, an example of an external hardware peripheral that allows users to make basic videos, transmit videos of themselves over the Internet, and take pictures.
Short for Compact Disc-Read Only Memory, CD-ROM drives are CD players inside computers that can have speeds in the range from 1x and beyond, and have the capability of playing audio CDs and computer data CDs. Below is a picture of the front and back of a standard CD-ROM drive.
Interfaces
Below are the different types of Interfaces that allow a CD-ROM and other disc drives to connect to the computer.
IDE / ATA - One of the most commonly used interfaces used still today to connect disc drives to the computer.
Panasonic - Older proprietary interface.
Parallel - Interface used with old external CD-ROM drives.
PCMCIA (PC Card) - Interface sometimes used to connect external disc drives to laptop computers.
SATA - Quickly replacing IDE as the new standard to connect disc drives.
SCSI- It is highly recommended to get a card that matches the CD-ROM drive as some of the earlier drives had proprietary SCSI interfaces. Otherwise, a SCSI-2 card is recommended.
USB - Interface most commonly used to connect external disc drives.
CD-ROM transfer speeds
Below is the standard transfer rates and access times of the majority of CD-ROM drives. The below figures are averages you can expect to find on each speed of CD-ROM drive. These averages may be slower or faster than your CD-ROM drive and to where the CD-ROM is accessing the data from the CD-ROM. In general the higher this number is the faster the transfer rate or in the case of a disc burner the faster the write rate.
Drive speed---------------- Transfer rate (BPS) ---- Access time (ms)
Single-speed (1x) -------- 153,600------------------- 400
Double-speed (2x)-------- 307,200------------------- 300
Triple-speed (3x)--------- 460,800 -------------------200
Quad-speed (4x)---------- 614,400------------------ 150
Six-speed (6x) -------------921,600 ----------------- 150
Eight-speed (8x)----------- 1,228,800---------------- 100
Ten-speed (10x)----------- 1,536,000---------------- 100
Twelve-speed (12x)-------- 1,843,200 ----------------100
Sixteen-speed (16x) -------2,457,600 -----------------90
Eighteen-speed (18x) ------2,764,800 -----------------90
Twenty-four-speed (24x) - 3,686,400----------------- 90
Thirty-two-speed (32x)---- 4,915,200 -----------------85
One-hundred-speed (100x) --15,360,000 --------------80
CAV drives (12x - 24x) -------1,843,200 - 3,686,400--- 150-90

Monitor

Monitor1. Also called a video display terminal (VDT) a monitor is a video display screen and the hard shell that holds it. In its most common usage, monitor refers only to devices that contain no electronic equipment other than what is essentially needed to display and adjust the characteristics of an image.
Like most TVs, the computer monitor has a CRT (Cathode Ray Tube) that is found inside the computer monitor as illustrated in the picture to the right. The CRT is the main component and most expensive part within your computer monitor.


Printers
An external hardware device responsible for taking computer data and generating a hard copy of that data. Printers are one of the most used peripherals on computers and are commonly used to print text, images, and/or photos. The image to the right is a visual example of the Lexmardk Z605 Inkjet printer and is an example of what a printer may look like.
Types of printers
DOT Matrix printer
Inkjet printer Laser Printer
Thermal Printer
LeD printer
Printer interfaces
Firewire
MPP-1150
Parllel port
SCSI
Serial Port
USB

Vedio Cards
Also known as a graphics card, video card, video board, or a video controller, a video adapter is an internal circuit board that allows a display device such as a monitor to display a picture from the computer. Today video cards are most commonly connected to the AGP slot or PCIe slot on the motherboard, however, can also be found on-board or in a PCI slot.
Above is an example image of the ATI Radeon 9600 AGP video card; most video cards today resemble the picture shown below. As can be seen in the above picture this video card has three connections, the standard
VGA connector,S-Video connector, and theDVI connector.

Tuesday, May 4, 2010

Antivirus Tools Cannot Clean Infected Files in the _Restore Folder

Antivirus Tools Cannot Clean Infected Files in the _Restore Folder


SYMPTOMS
When you run an antivirus program, you may receive a report that indicates that...

When you run an antivirus program, you may receive a report that indicates that one or more files in the _Restore\Temp or the _Restore\Archive folders contain a virus or are infected with a virus. Also, your antivirus program may indicate an inability to remove the virus from the file or files.

CAUSE
This behavior occurs because the System Restore feature in Windows Millennium Ed...

This behavior occurs because the System Restore feature in Windows Millennium Edition (Me) protects all folders and files in the _Restore folder on the Windows Me system partition. This folder and all of its subfolders are the data store that the System Restore feature uses to restore your computer's operating system to a previous state from a previous point in time.

Although some antivirus programs may have the ability to work with files that have been compressed or stored in .zip or .cab file format, the System Restore feature does not permit these utilities to manipulate these files within the data store. The data store is protected for data integrity purposes, and the System Restore feature is the only method you can use to obtain access to the data store. Because of this, the antivirus program is unable to remove the virus from the file or files in the data store. The files in the data store are inactive and can be used only by the System Restore feature.

RESOLUTION
To work around this behavior, use the appropriate method. Use the First In First...

To work around this behavior, use the appropriate method.

Use the First In First Out (FIFO) Feature

The FIFO routine purges the oldest restore points so that newer, more current restore points can be added to the data store. FIFO starts automatically when the files in the data store reach 90 percent of the maximum size of the data store. System Restore purges the oldest files first until the files in the data store occupy no more than 50 percent of the maximum size of the data store.

For example, if the maximum size of the data store is 400 megabytes (MB), 90 percent of this is 360 MB and 50 percent is 200 MB. If the data store is 200 MB when you view the properties of the _Restore folder, it is 50 percent of the maximum size. If you adjust the size of the data store to the minimum size of 200 MB, FIFO occurs when you click Apply.

NOTE: If the data store is less than 90 percent (180 MB) of the minimum (200 MB) value, adjusting the size does not have any effect in purging restore points. In this scenario, you must carefully consider the use of the methods that are described in this article.

Over a period of time, the data store purges restore points on a FIFO basis as the maximum size of the data store is reached. There are a few scenarios in which FIFO can be used to purge older restore points to retain more recent restore points on the computer.

FIFO Method 1

No action is required if the system has been cleaned and only the data store is reported by the antivirus tool to have suspicious files. Until all infected files are processed out on a FIFO basis, the antivirus tool may still report that there are infected files that it cannot obtain access to within the data store.

FIFO Method 2

You can trigger the FIFO feature to remove older restore points from the data store by resizing the data store. To use the System Restore feature to adjust the size of the data store:
  1. View the properties of the _Restore folder to determine how much data is actually in the data store. You do this to determine if this step will have any effect on the data store. If the data store uses less than 90 percent (less than 180 MB) of the minimum value (200 MB), this method may have no effect on purging the restore points. If less than 90 percent of the data store is used, even at the minimum settings you should consider using FIFO method 1 or using the "Manually Purge the Data Store" method that is listed later in this article.
  2. Click Start, point to Settings, and then click Control Panel.
  3. Double-click System, and then click the Performance tab.
  4. Click File System.
  5. Adjust the System Restore disk space use slider to the approximate lower amount, and then click Apply.

    Note that you can use the System Restore disk space use slider to select the minimum amount of space to allocate for the data store, the maximum amount, or a size in between. Adjusting the slider to a lower value changes the the values that trigger FIFO. You may need to restart your computer for any changes to take effect.
  6. Click OK, and then click OK to close System properties.
  7. Use the antivirus tool to scan the computer to verify that the virus-infected files have been purged from the data store. If there are still infected files in the data store, repeat the previous steps and lower the data store size until the data store is clear of infected files.

    Note that you can also use the calendar page in the System Restore tool to view how far back the restore points were purged.
  8. After the infected files have been cleared from the data store by using this method, return the slider to the original or appropriate size, click OK to close any open windows, and then restart your computer.
If there still is an infected file in the data store after you resize the data store to the minimum size, you can either wait for it to be processed out on a FIFO basis (FIFO method 1), or you may want to consider using the "Manually Purge the Data Store" method that is described later in this article to remove all restore points on your computer.

Manually Purge the Data Store

To completely and immediately remove the infected file or files in the data store, disable and re-enable the System Restore feature.

WARNING: Using the following steps will completely remove all restore points from the data store. Do not use this method if this will cause problems. When you enable the System Restore feature again, the System Restore feature will create a new restore point and then resume monitoring your computer.
  1. Click Start, point to Settings, and then click Control Panel.
  2. Double-click System, and then click the Performance tab.
  3. Click File System, and then click the Troubleshooting tab.
  4. Click to select the Disable System Restore check box, click Apply, click to clear the Disable System Restore check box, click Apply, and then click OK.
  5. Restart the computer when you are prompted to do so. When the computer restarts, the data store is purged and the System Restore feature begins monitoring the system again.

STATUS
This behavior is by design.

This behavior is by design.

Saturday, May 1, 2010

Computer keyboard shortcut keys

Shortcut keys ABCs

Shortcut keys help provide an easier and usually quicker method of navigating and using computer software programs. Shortcut keys are commonly accessed by using the Alt (on IBM compatible computers), command key (on Apple computers), Ctrl, and/or Shift in conjunction with a single letter. The de facto standard for listing a shortcut is listing the modifier key, a plus symbol, and the single character. Or in other words, "ALT+S" is telling you to press the Alt key and while continuing to hold the Alt key, press the S key to perform the shortcut.

In addition to the shortcuts listed on this page, users can find the shortcut keys to their most popular program by looking for underlined letters in their menus. For example, in the picture to the right you'll can notice that the "F" in File has been underlined. You will then know that you can press the Alt key and F to access the File menu (Note: Some programs require the user press and hold ALT to see the underlined characters). Finally, as can also be seen some of the common features such as Open (Ctrl+O) and Save (Ctrl+S) have shortcut keys assigned to them.

As you begin to work with shortcut keys you will notice that several applications share the same shortcut keys. We have listed many of these keys in our basic PC shortcut keys section.

Note: Users outside the United States or users using a foreign copy of a Microsoft Windows or Microsoft application may not be able to get all the below shortcut keys to perform the function listed below.

Basic PC shortcut keys

The below basic shortcut keys are a listing of shortcut keys that will work with almost all IBM compatible computers and software programs. It is highly recommended that all users keep a good reference of the below short cut keys and/or try to memorize the below keys. Doing so will dramatically increase your productivity.

Shortcut KeysDescription
Alt + FFile menu options in current program.
Alt + EEdit options in current program
F1Universal Help in almost every Windows program.
Ctrl + ASelect all text.
Ctrl + XCut selected item.
Shift + DelCut selected item.
Ctrl + CCopy selected item.
Ctrl + InsCopy selected item
Ctrl + VPaste
Shift + InsPaste
HomeGoes to beginning of current line.
Ctrl + HomeGoes to beginning of document.
EndGoes to end of current line.
Ctrl + EndGoes to end of document.
Shift + HomeHighlights from current position to beginning of line.
Shift + EndHighlights from current position to end of line.
Ctrl + Left arrowMoves one word to the left at a time.
Ctrl + Right arrow Moves one word to the right at a time.

Computer Hardware and Software Related Topics

My Blog List

My Blog List

Popular Posts

Powered By Blogger