Health Tips, Yoga, Spiritual & Computer Hardware Drivers (1000 and above Free Software Download Center And Related Topics and Hot news)


Search This Blog

Friday, December 17, 2010

How to take a Screen Shot in XP and Windows 7?

How to take a Screen Shot in XP and Windows 7?

The feature which allows you to take a screen shot in Windows XP is very useful. You can capture the image on your screen as you take a screen shot in Windows XP and save it for later. It can be saved for many reasons. Sometimes you need to save the image of the screen e.g. if you get an error message on your system, you can take a screen shot in Windows XP operating system and send it to your support person. You can show the webpage you are looking at to someone. That way you won’t have to send a link of the web site. Screen shots are very helpful when you want to show how to perform different computer tasks or solve problems while using Windows. Screen shots can demonstrate all these things as you send them via Microsoft Word, instant messaging and e-mails.

This is how you take a screen shot and then save it:

Choose the window you want to take the screen shot of by clicking it. Press ALT+PRINT SCREEN. The PRINT SCREEN key is close to the upper right of the keyboard. If you want to take the screen shot of the entire desktop instead of a single window, you just have to press the PRINT SCREEN key. You won’t need to press the ALT key along with it.

Click on the Start button, from Programs go to Accessories, and click on Paint.

When the Paint window opens, click on Edit, and then choose and click on Paste.

When you see the image in the Paint window, click on File, and then scroll down and click on Save As.

When the Save As dialog box appears, type a name for the screen shot in the File name box.

Click on Save in the end.

Now this picture is like any other picture save on your computer as you can print or e-mail it.

You can take a screen shot in Windows XP whenever you want. But you can’t take a screen shot prior to you logging onto your computer and also while a video is being played in Microsoft Windows Media Player.

How to add background picture to Excel 2007 spreadsheet

You can insert a picture in Word, PowerPoint or Excel 2007 very easily. Many people know how to insert a picture in Excel 2007 spreadsheet but they donĂ¢€™t know how to add background picture to Excel 2007 spreadsheet. Excel 2007 spreadsheets largely consist of numbers, charts, tables etc. You can give your personal creative touch to your work on Excel 2007 if you add background picture to Excel 2007 spreadsheet. After you add background picture to Excel 2007 spreadsheet, you will be able to make it look less boring and much more interesting. Follow these easy and simple steps to add background picture to Excel 2007 spreadsheet.

Open the Excel spreadsheet to which you would like to add the background picture.

Select Page Layout from the ribbon.


Click on Background.

The Sheet Background window pane will appear. Choose the graphics or image you want to add as the background.

Click on Insert at the bottom.

You have successfully added a background image to your Excel 2007 spreadsheet! You can change the colors as well as the font to suit the background picture. It is recommended that you select a very light or a very dark colored picture so that the data on the foreground stands out.


How to clear your sensitive information on system shutdown?

How to clear your sensitive information on system shutdown?

During data processing some operating systems use the hard disk as memory, called virtual memory. During processing, operating system transfers some data and programs from RAM to hard disk and reloads again when required. The data or programs are stored in hard disk in temporary file called the swap file. This technique of swapping data between memory and hard disk is called paging. Operating system spends a lot of time in paging process, instead of executing the application software. But the problem is that while working you use different software programs on computer and page file may contain your confidential information or stored in non encrypted format. To reduce this risk, you can set your computer to clear out page file automatically each time you shutdown your computer.

Perform the given steps to set your system clear page file automatically:

  • To enable this feature, you will need to be logged into your computer with administrative rights.

  • First click on start button to open control panel and then click here on "Administrative Tools" option.

  • Now "Local Security Settings" panel will appear, on lift side of this panel click on "Local Policies".

  • Here click on "Security Options" then double click on "Shutdown: Clear virtual memory pagefile" option.


  • Now small dialog box will appear with options, "Enabled or Disabled" the page file.

  • Select the "Enabled" radio button to set clear page file each time you shutdown computer.

Press Apply button to save settings and then click on Ok button to finish.

Monday, December 13, 2010

How to increase your system performance?

How to increase your system performance?

  • Window Disk Cleanup is very useful tool to increase the performance of your system. You can increase also the free space on the hard disk, because Disk Cleanup utility searches many unnecessary programs and files on your hard drive that you can delete. This tool perform many useful tasks to cleanup your hard disk. For example

Delete the temporary internet files

Delete the old windows programs that you are not using.

Delete all temp Downloaded Program files

Delete Office Setup files

Delete Old Chkdsk file

Delete the Recycle Bin items

Delete all Setup log files

Delete the windows temporary files

Delete the Web Client or Publisher Temporary files.

Delete all Catalog file for the content indexer

You can remove the optional windows components that you are not using.

To run the Disk cleanup utility follows the given steps:

Click on Start button, Programs, go to Accessories, and go to System Tools and then click on Disk Cleanup.

Now a window popup will appear to select the hard disk partition with option "Select the drive you want to clean up" for example C, D drive, but you can choose partition one by one for scanning.

Now Disk Cleanup will takes some time to access your system then open a window to show "You can use Disk Cleanup to free up to 112,151 of disk space on drive C" (in this case) available after deleting temporary files. On this window a button "View files" is used to check the detail of the files that you are going to delete.

If you scroll down with in that window, you will get many options to choose, select the all options to clean your system in detail, and then click OK to continue.

On the same window another tab is available with the name "More Options".

Under the more options tab, there are three clean up buttons to clean "Window Components, Installed Programs and System Restore" , select any one of them and press OK to run it.

How to disable/enable the usage of USB storage devices?

How to disable/enable the usage of USB storage devices?

USB drives (also known as flash drive, mobile disk or pen drive) are becoming the most popular standard in these days to store and move data. USB support is available in PCs of both IBM-compatible and Apple computers. USB port support hot plugging and plug & play. The USB allows up to 127 devices to be connected to the bus via a single port. The driver name "usbstor.sys" is used to communicate any USB drives to the operating system.

USB drives are indeed very useful in these days but a user can easily use to transfer any confidential information from your computer to others and can also upload viruses affected files to your computer by accidentally or deliberately. But you can prevent the users to connect any USB drives in the computer by disabling the ability of "usbstor.sys" (USB driver) to load in system. It will block the USB storage devices only and your system USB keyboard, mouse and others USB devices will work properly.

Perform the following steps to block the USB storage devices:

  • To edit this feature, you will need to be logged into your computer with administrative rights.

  • First click on Start button to open "Run" and type "regedit" then press Ok button to open the Registry Editor.

In registry editor locate the given path:

HKEY_LOCAL_MACHINE\SYSTEM\CurrentControlSet\Services\USBSTOR

Here select the "USBSTOR" folder and in right side of the registry editor panel find the value with name "Start".

Double click on "Start" and then set its value 4 under "Value data" section.

Close the Registry editor and restart your computer for changes to apply.

Now when you want to restore the default setting, open the Registry Editor and set its value back to 3.


Now again close the Registry editor and restart your computer for changes to apply.

How to hide your important data from other users?

Normally when you need to secure your important data from other users, then your first choice is to burn it on CD or put it to removable drive instead of hard drive. But imagine if your data size is more than 100 GB then it is not easy to burn it on CD. No worry, you can save your full drive from other users access using this trick.

Perform the given steps to hide your system data partition:


  • To enable this feature, you will need to be logged into your computer with administrative rights.

  • First click on Start button to open "Run" and type "CMD" (without the quotes) then press Ok button to open Command Prompt.

Now type diskpart on the blinking cursor and wait for 5 seconds to appear diskpart> utility.

To show the list of volume, type list volume command after the diskpart> prompt, this command will show you all system drives detail.

Now first select the volume that you want to hide, for example,

if you need to hide F drive then first type select volume 2 (in this case) and press enter button.

After loading volume, type remove letter F (in this case) to hide F drive.

Now exit from command prompt and open My Computer to verify drives.

But next time, when you want to unhide the D drive, just run assign drive F command after loading volume 2.


How to clear your sensitive information on system shutdown?

How to clear your sensitive information on system shutdown?

During data processing some operating systems use the hard disk as memory, called virtual memory. During processing, operating system transfers some data and programs from RAM to hard disk and reloads again when required. The data or programs are stored in hard disk in temporary file called the swap file. This technique of swapping data between memory and hard disk is called paging. Operating system spends a lot of time in paging process, instead of executing the application software. But the problem is that while working you use different software programs on computer and page file may contain your confidential information or stored in non encrypted format. To reduce this risk, you can set your computer to clear out page file automatically each time you shutdown your computer.

Perform the given steps to set your system clear page file automatically:

  • To enable this feature, you will need to be logged into your computer with administrative rights.

  • First click on start button to open control panel and then click here on "Administrative Tools" option.

  • Now "Local Security Settings" panel will appear, on lift side of this panel click on "Local Policies".

  • Here click on "Security Options" then double click on "Shutdown: Clear virtual memory pagefile" option.

  • Now small dialog box will appear with options, "Enabled or Disabled" the page file.

  • Select the "Enabled" radio button to set clear page file each time you shutdown computer.

Press Apply button to save settings and then click on Ok button to finish.


How to Change Windows 7 Taskbar to Work like Vista?


A lot of people don’t like the new taskbar feature of Windows 7. Others prefer the old Vista taskbar over the Windows 7 taskbar. You can change Windows 7 taskbar to work like Vista taskbar. It takes some time before you get accustomed to your Windows 7 taskbar. But if you don’t have time to get used to the new version and want your computer to work the same way like before, here is a way to change Windows 7 taskbar to work like Vista

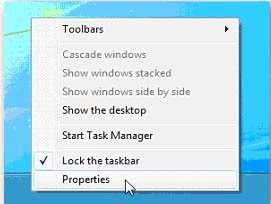
Right-click the empty area on the Taskbar

Select Properties

The Taskbar and Start Menu Properties windows will open. Under the box called “Use small icons” and “Taskbar location on screen”, select the option “Combine when taskbar is full” from the drop down of Taskbar buttons.

Click on the Apply button.

You have successfully changed the Windows 7 taskbar to work like Vista. Now the Taskbar look similar to how it did in Vista. It will not appear very much alike to Vista taskbar, but the functions will be the same.

A different way to achieve the same is by unpinning all the programs from the Windows 7 taskbar.

Add a quick launch bar to Windows 7. This will change the Windows 7 taskbar to work like Vista after the Quick Launch Bar is enabled

Computer Hardware and Software Related Topics

My Blog List

My Blog List

Popular Posts

Powered By Blogger